Configuration
In order to use GravityZone Security for Email, the add-on must be enabled from your company's Licensing page.
Once the add-on is licensed, the option to create an Email Security account for the company will appear under the Email Security page:

Click Create account. The process is automated, and a pop-up will appear in the lower right side of the console announcing when the account is available.
Click Open console to access the account.
To configure GravityZone Security for Email with your email service you need to follow these steps:
1. Add Domains
Add a domain to point to your mail server.
Log in to GravityZone Security for Email
Go to Products > Product Configuration > Domains.

Click the Add button.

Fill in the domain information:
Your domain name under Domain.
Note
You can find your domain name here:
Office 365: O365 > Settings > Domains.
Google Workspace: Google Domains > My domains.
Exchange: Microsoft Exchange Admin Center > mail flow > accepted domains.
The full hostname or IP address of your mail server under Deliver To
Note
You can add additional Inbound Mail routes later.

Click the Add button
This enables a DKIM for your domain. To view the DKIM public key, click on the view
 button.
Note
For more information on DKIM, refer to Product Configuration
2. Add Mailboxes
Add your user mailboxes to GravityZone Security for Email . Each mailbox is associated to a user. The following methods are available for importing your Mailboxes:
You can import users' email addresses as a bulk import using a .CSV file.
You can perform an Azure Active Directory synchronization.
You can perform an On Premise Active Directory synchronization.
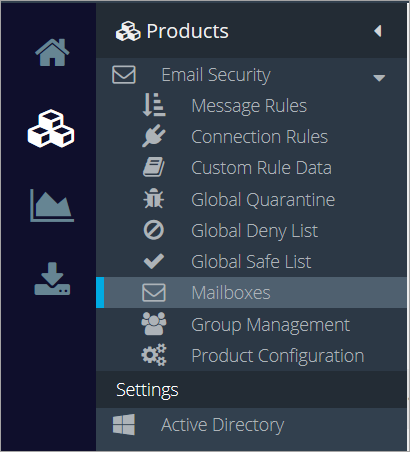
You can manually add each mailbox from Products > Email Security > Mailboxes.
To manually add the Mailboxes follow the steps below:
Go to Products > Email Security > Mailboxes.
Click the Add button and add an email address.

Note
A real name can be added to improve the chances of emails being correctly captured by Message Rules. This is currently only supported through Active Directory synchronization. Click here for a step by step guide on importing mailboxes from Microsoft Exchange Online
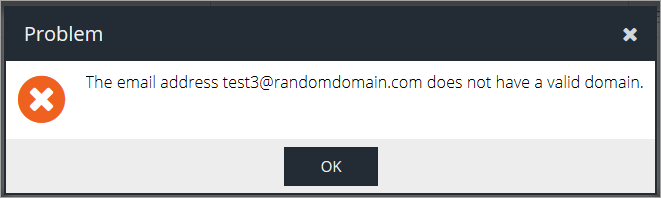
Press Enter.
Note
If the email address is not on a domain that has previously been added it will result in an error message:
Configure the following settings:
Exec Tracking - enable this checkbox to mark the email as belonging to a company executive for the purpose of the Executive Tracking Condition.
Note
You can activate executive tracking for specific Active Directory groups from Group Management.
Manage Variants - add or remove multiple variants of a user's name to improve tracking (name variations, maiden names, middle names, etc.).
To add a name variant click the Add button, type in the name variant and press enter.
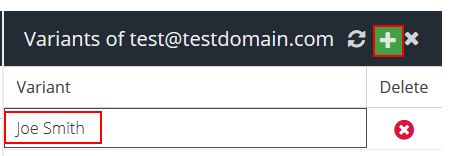
To remove the variant click the Delete
 button
Groups - add or remove the user from specific Active Directory Groups
To add the user to a AD group click the Add Group Membership button, check the box for the group(s) you want to assign the user to and click Select.
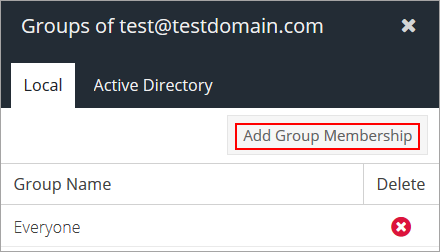
To remove a user from a group click the Delete
button next to the group.
Aliases - add multiple email addresses to a single user.
Note
Aliases allow email destined for variants of the primary mailbox address to be accepted through the DHA rule.
To add a new email address to a user click the Add button, type in the email address and press Enter.
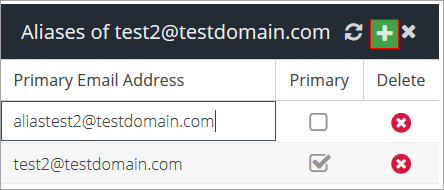
Note
You will have to mark one of the email addresses as primary by checking the box in the Primary column.
Repeat the process for any additional aliases belonging to this primary email address.
To delete an alias click the Delete
button next to the email address.
3. Ensure you can accept emails from GravityZone Security for Email servers
The next step is to ensure that your firewall is configured to allow e-mail to be delivered from the GravityZone Security for Email servers after it has been filtered. You should add firewall rule entries to allow the following IP addresses to connect from the public Internet to your mail server on port 25.
Note
This step is recommended only for On Premises mail servers.
You can find a list of our IP addresses here:
4. Configure your email service
Ensure inbound and outbound firewall rules AND/OR mail server connector rules (e.g. Office 365) are configured to also allow authorized GravityZone Security for Email servers inbound and out bound(if previously restricted).
You can find a list of our IP addresses here:
If you wish to use the GravityZone Security for Email service for outbound E-mail please follow the instructions in the links below:
5. Whitelist GravityZone Security for Email addresses
If existing mail delivery platform (e.g. Exchange, Office 365, Gmail) is performing any reputational/connection level/spamchecks on inbound SMTP servers ensure GravityZone Security for Email addresses are whitelisted to prevent incorrect spam identification or potential delays when GravityZone Security for Email relays mail onwards.
Note
When using GravityZone Security for Email in a GSuite environment careful consideration has to be taken with regards to internal G Suite messages.
For more information on this topic see the below links:
6. Safelist internal domains for sending inbound emails
The default Spoofing rule within GravityZone Security for Email ensures that any inbound emails received from internal domains will be quarantined ([email protected] > [email protected]) as spam.
Legitimate scenarios exist where third party external servers send inbound mail from addresses that purport to be from your internal domain. Identify whether such scenarios exist within your organization and if so it, add the sending server IP addresses to the GravityZone Security for Email global safelist.
For information on this topic see Spam Safe List.
7. Update External DNS SPF records
Update any External DNS SPF records for mail relayed domains to include scanscope.net.
For more information see:
8. Define external records
To help combat impersonation/spoofing attacks ensure that External DNS, DKIM and DMARC records are defined to take advantage of default out of the box rules.
For information on this topic see:
9. Reduce DNS TTL
To ensure easy roll back of MX records if required it is recommended to reduce DNS TTL of MX records to a minimum value.
10. Verify default and custom rules
Ensure you have reviewed default rules provided and configured any specific rules required for the organizational policy to be enforced. Determine whether user-based spam digests will be utilized(and whether SSO is preferred).
11. Assign roles to users using Spam Digests
Import users and assign “End User Portal” role to any users using Spam Digests.
For more information on this topic see Administrators.
12. Verify SecureMail configuration
Ensure the appropriate SecureMail rule is configured and in place.
For more information on this topic see SecureMail.
13. Configure Outbound flow
Configure Outbound SMTP (Smart Host) flow to go via GravityZone Security for Email SMTP Servers.
For more information on this topic see:
14. Reroute inbound mail
Modify MX records to re-route inbound mail through GravityZone Security for Email.
For more information see:
15. Verify inbound and outbound routes
To verify inbound and outbound send an email from and to one of your configured mailboxes and then go to Analytics > Email Activity within the dashboard. Make sure the messages show up in the reports.
16. Final Steps
After a confirming the proper functionality of GravityZone Security for Email, complete these final steps:
Remove any unwanted SPF records from DNS that are no longer required.
Ensure inbound and outbound firewall rules AND/OR mail server connector rules (e.g. Office 365) where appropriate are locked down to only allow authorized GravityZone Security for Email SMTP servers inbound and outbound.
For more information on this topic see:
For on-premise Exchange environments take care of any internal servers that are configured to send outbound directly rather than via Exchange. Ensure Firewall rules continue to allow SMTP traffic outbound from these sources OR ensure they are relayed via Exchange.