Configure GMail using Google Workspace for GravityZone Security for Email
Follow these procedure to integrate GravityZone Security for Email with Google Workspace Gmail, for inbound and outbound email delivery.:
To configure GravityZone Security for Email for use with Google Workspace follow the steps below:
Configuring Inbound Mail
Go to Products > GravityZone Security for Email > Product Configuration.
Go to Inbound Mail.
Click the Add button
 to add a new delivery route.
Select your Domain from the drop-down list.
Under Cost set route priority to
5.The cost defines route priority for multiple routes.The lower the number, the higher the priority.
Under Route enter the following:
ASPMX.L.GOOGLE.COMUpdate to save changes.
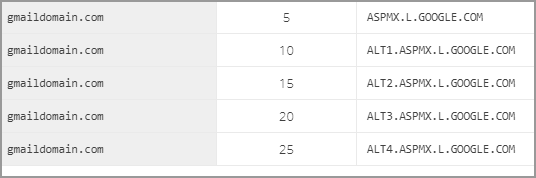
Repeat steps 3 to 7 to add the following routes and associated costs:
ALT1.ASPMX.L.GOOGLE.COMwith the cost of10ALT2.ASPMX.L.GOOGLE.COMwith the cost of15ALT3.ASPMX.L.GOOGLE.COMwith the cost of20ALT4.ASPMX.L.GOOGLE.COMwith the cost of25The final routes should look similar to the ones in the screenshot below.
Configuring Outbound Mail
Go to Products > GravityZone Security for Email > Product Configuration.
Go to Outbound Mail.
Click the Add
button.Under Hostname enter the following hostname:
spf://_spf.google.comUpdate to save changes.
You should configure GMail using Google Workspace to block any inbound email that does not originate from the GravityZone Security for Email (EMS) product. However, you will need to do this via a two-step process. This section is split into two sections – prior MX record change and post MX record change.
Prior to changing MX records
Before changing MX records it is recommended that the GravityZone Security for Email IP addresses are added to the inbound gateway so that when MX records are changed all messages are not quarantined.
Note
You may already have inbound gateway entries listed. If this is the case you need to append the entries below to the existing list and then remove the existing entries once the MX records have been changed.
Follow the steps below:
Login to the Google Workspace Admin Console with an administrators account.
Click on the Menu button
 .
.Select Admin > Apps > Google Workspace.
Click on GMail to take you to Settings for Gmail.
Click on Advanced Settings at the bottom of the page.
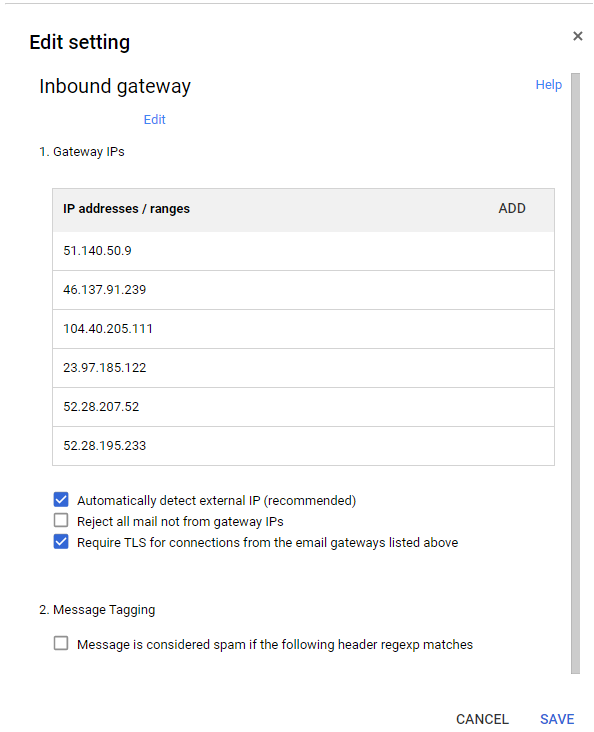
Scroll down to Spam, phishing, and malware and configure/edit the Inbound Gateways.
Add a Name to the Inbound setting.
Add the IP addresses for our service and click Save.
Note
You can find a list of our IP addresses here:
The entries should look like this if using the EU servers:
Note
Ensure you do not check the Reject all mail not from gateway IPs box.
At the bottom of the Advanced Settings page, click Save to apply the changes.
Ensure that this configuration is replicated to Google Workspace before changing any MX records.
Note
It can take up to an hour for changes to propagate to user accounts for GMail using Google Workspace You can track changes in the Admin console audit log.
Post MX record change
Once MX records have been changed and replicated to the internet email should start flowing through the GravityZone Security for Email product. You can verify this via the GravityZone Security for Email Activity reports and charts. You can also check this in the Google Workspace portal by following these steps:
Login to the Google Workspace Admin Console with an administrators account.
Click on the Menu button
.Select Admin > Apps > Google Workpace.
Click on GMail to take you to Settings for Gmail.
Click on Setup.
Check that the MX records match the below:
Additional Options
By default, Gmail using Google Workspace will still scan all emails for spam. If you do not want Google Workspace to quarantine any of the messages, you can whitelist the GravityZone Security for Email service IP’s. To do this follow these steps:
Login to the Google Workspace Admin Console with an administrators account.
Click on the Menu button
.Select Admin > Apps > Google Workpace.
Click on GMail to take you to Settings for Gmail.
Click on Advanced Settings at the bottom of the page.
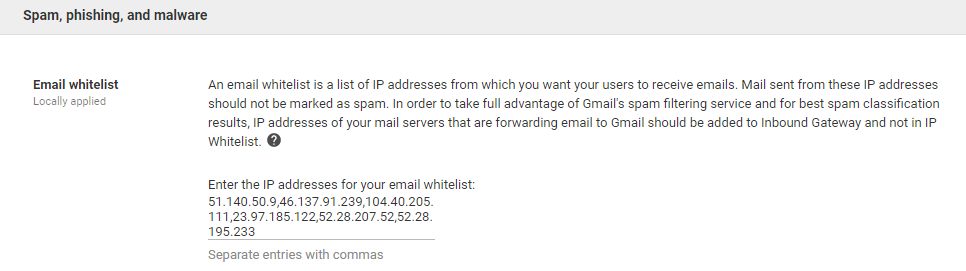
Scroll down to Spam, phishing, and malware and under Email whitelist add the GravityZone Security for Email service IP addresses:
The entries should look like this if using the EU servers:
At the bottom of the Advanced Settings page, click Save to apply the changes
Warning
If there are valid reasons for inbound messages to be delivered direct to Google Workspace the IP addresses of the sending servers should be added to the Inbound Gateways section prior to making this change. Failure to do so will block messages coming from those servers.
Login to your Google Workspace Admin Console with an administrator account.
Click on the Menu button
.Select Admin > Apps > Google Workpace.
Click on GMail to take you to Settings for Gmail.
At the bottom of the page, click Advanced Settings.
Go to Hosts > Add Route.
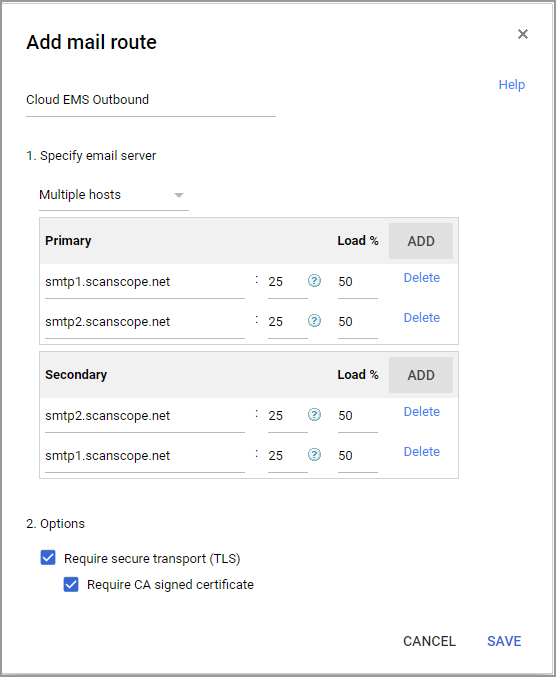
Enter a Name for the route, such as GravityZone Security for Email Outbound.
In the Specify email server select Multiple hosts.
Add a primary entry for each of the outbound servers based on your region.
For US and ROW open ports
25and587and add the following hosts:smtp1.us.scanscope.netsmtp2.us.scanscope.net
For EU open ports
25and587and add the following hosts:smtp1.scanscope.netsmtp2.scanscope.net
Click Save.
Navigate back to General settings > Routing > Routing section.
Click Configure for routing.
The Add settings option appears.
Enter a Name for the rule, such as GravityZone Security for Email Outbound Rule.
Under Messages to affect(section 1), select Outbound.
Under For the above types of messages, do the following(section 3), select Change route.
Change Normal routing to GravityZone Security for Email Outbound Rule, created above.
(Optional)Under Encryption (onward delivery only), select Require Secure Transport (TLS).
Click Add Settings or Save if you are editing an existing configuration.
At the bottom of the Advanced Settings page, click Save to apply changes.
Note
It can take up to one hour for your settings to come into effect. You can track changes in the Admin console audit log.
Login to the Google Workspace Admin Console with an administrators account.
Click on the Menu button
.Select Admin > Apps > Google Workpace.
Click on GMail to take you to Settings for Gmail.
Click on Hosts section.
Click on the Add Route button.
Give the route a Name like “Google Internal”.
In the Specify Email server select Multiple hosts.
Add a primary entry for each of the GMail Servers listed below:
aspmx.l.google.com
alt1.aspmx.l.google.com
alt2.aspmx.l.google.com
alt3.aspmx.l.google.com
alt4.aspmx.l.google.com
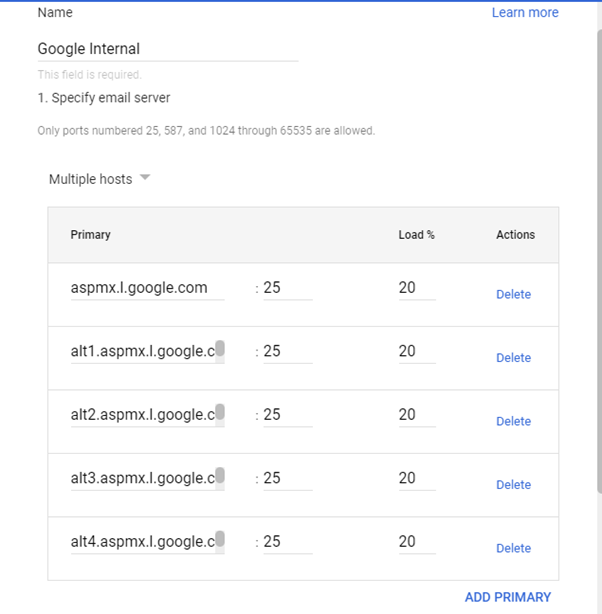
Click Save.
Go to the General setting tab and scroll to the Routing setting in the Routing section.
Click on Add Another for Routing. This will open up a new Add setting option.
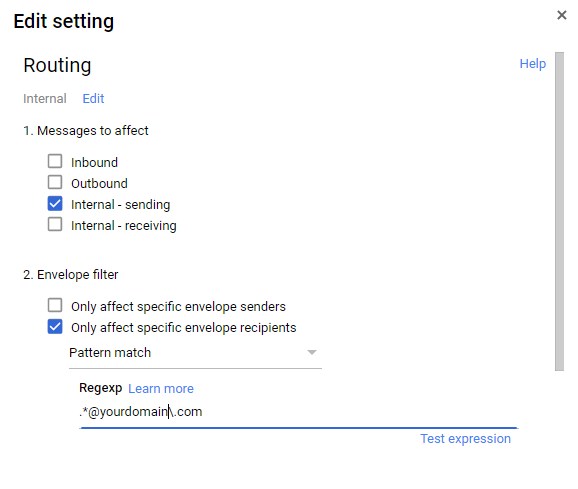
Enter a name like Internal Route.
Select the checkbox for Internal – Sending in Messages to affect.
Select only affect specific envelope recipients and define a REGEX for your internal domain.
Note
For multiple domains you can add them into the regex in this format:
.*@firstdomain\.com|.*@seconddomain\.co\.uk
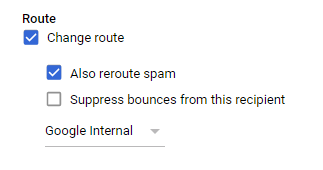
Select Change route in For the above types of messages, to do the following.
Change the Normal routing to the one created above.
Click on Show Options at the bottom of this page and Select Users and Groups” under Account types to affect:
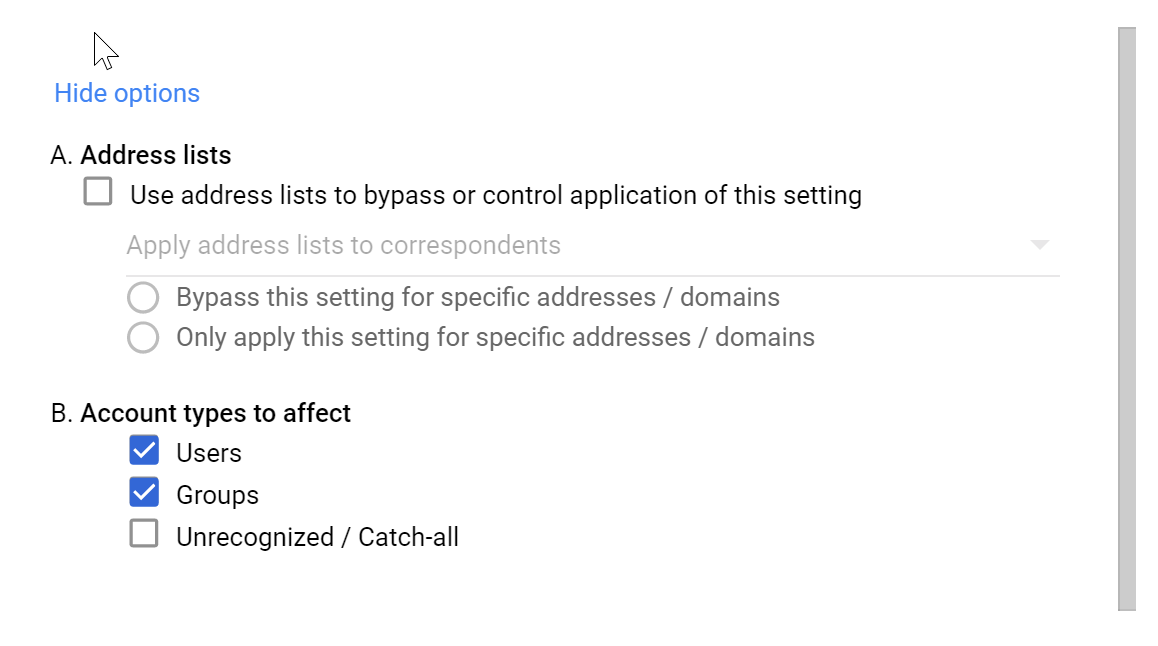
Click the Add Setting button, then click Save.
At the bottom of the Advanced Settings page, click Save.
Note
Now all internal mail is routed directly to Google servers, and all other mail routes through the GravityZone Security for Email Outbound Gateway.